Friday, February 20, 2015

Easy Peasy Card Creation!

     Hello all my Crafty Peeps! Today I just wanted to share 2 super quick cards with you. It literally took me less than 20 minutes to make both cards, which to be honest it could have been even quicker if I would have used a hot glue gun for the flowers rather than a clear liquid glue, but I didn't want to wait for the gun to heat up. How ironic that my impatience actually made something take longer, lol!
     You will also notice I got some new watermarks for my pictures. Woo Hoo! I am in love with them! They are so pretty and elegant. I purchased them from a very sweet lady named Michele from Michele R Designs. Not only does she sell custom watermarks but she also sells beautiful digital papers and recently has also started to make paper pads :)
      Now that I have some gorgeous watermarks, I just need to work on the watermark placement. If you have any suggestions on watermark placements I would love to hear them. I have always been told that you want to place them over your design so that they can't be erased or cropped out, but I find placing them over the design takes away from your design and image view. So that is something I will need to tool around with but overall my new custom watermark gives a whole new look that I am in love with!
      Thank you for stopping by my blog today! I wish everyone a wonderful, blessed, and warm weekend! I may be in Florida but it has been in the low 20's here and with the wind chill it's felt like the low teens, so this Florida gal is freezing her buns off, lol!
Outside:  For the base of the card I used the The Stamps of Life Circle Flip Its 2 die set and cut purple Recollections cardstock which came in a multi pack of colors, as well as some matching patterned paper that I had in my scrap paper stash. To cut the flower I used some frosted white vellum and cut it with the My Favorite Things Hybrid Camellia Flower Die-namics. For the bottom and middle layers of the flower I cut them out twice. The center I only cut once. To curl the edges of the flowers you can use your fingers, a rounded spoon handle, a smooth rounded pencil etc. but for me I like to use the Cricut Scoring Stylus Tool because I feel it gives the perfect curve and the paper glides nicely making for a smooth look. Now here is where the impatient part of me kicked in, because to hold the flower together, I used a clear liquid glue which is supposed to be for paper piecing and quilling since it dries completely clear with no gloss. However, because it's meant to give you time to move your paper that means it will take some time to set up. This is where I should have been presented with a "Here's your sign" by Bill Engvall, lol. So, if your wanting a fast set up then maybe you should use a hot glue gun.

Inside: The inside is basically just the center grouping of circles which I cut out using some of the other dies that came in The Stamps of Life Circle Flip Its 2 die set. I simply picked out the sizes and designs I liked, cut them, and layered them together. I used a very think foam pop dot and placed it behind the solid purple circle. I wanted a little lift but not to much because I felt the flower on the outside gave enough dimension. For thank you sentiment I used a Colorbox purple dye ink along with an amazing and generous stamp set that Stephanie Barnard gave to me for being her Stamps of Life Club Member. Just remember to stamp the sentiment before putting together all of your layers because it's no fun trying to stamp on top of foam dots, lol.
Here is a closer view of the flower.


Outside: This card was basically done in the exact same way as the card above other than I changed the papers and colors. The cardstock again was from Recollections and the patterned paper was from my scrap stash.

Inside: Again I used the same die set but I only used one of the scalloped circles and I used a sentiment from The Stamps of Life crazy4daisies stamp set. The sentiment was stamped with a StudioG dye ink stamp pad color. 


(Disclaimer: Any supply links listed above are links solely being used as a guide to show you what those items are. Some links may come directly from the manufacturer while others may not. Unless otherwise stated all products were purchased with my own money and in no way am I affiliated with these links nor the businesses associated with them. Please use discretion should you choose to shop from the links listed above. Thank you)

Tuesday, February 3, 2015

Sharing Some More Goodness

     Here are the other projects that I made. These are all Thank You's that I made for specific individuals and now that they have been photographed I will be popping them into the mail :) I will admit though that at first I struggled whether or not to post them before I mailed them because you never know who and when someone will read my blog, but I suppose it will still be a surprise to them because I'm not spilling the beans as to who is getting them, lol!
     I also wanted to let you know that I now have added links for my Facebook page, YouTube,Twitter, Instagram, and Pinterest so I would love it if you would go check them out and while your there give them a like, follow, share, subscribe, etc. These links can be found on the right side of the home page on my blog. Please be patient with me as I am just getting started on them as far as trying to intertwine the crafty part of my life/blog with them.
     Something I forgot to mention in my last blog post is that I have not been thrilled with my watermark program, so I have been checking around and I have written to someone to see if they can make a couple for me as well as help me figure out the best way to apply them to the pictures. I want to protect my pictures and creations but at the same time I don't want to make them look gaudy, if you know what I mean. Until then please excuse the current watermarks on my pictures. If things work out with getting a new watermark I will share that information with you so you can check into getting personalized watermarks for your pictures ;) Many blessings for a wonderful week!
For this card I used the following products from My Creative Time Trio Stitched Banner DiesGrainy Wood Background Stamp, Celebrate Good Times, and Speech Bubble Sentiments Stamp Set. The card stock is from Recollections, the inks are Tsukineko Brilliance Pearlescence inks, miscellaneous touches were done with Smooch Pearlized Accent Inks, the multicolored background was done with my daughter's water color paints, I used Versa Mark with some sparkling embossing powder for the sprinkles on the ice cream scoops, and I also added a few rhinestones.

I used the following products from My Creative Time Trio Stitched Banner DiesGrainy Wood Background Stamp, Celebrate Good Times, Happy Thoughts Stamp Set, and Alpha Pack Stamp Set. The card stock is from Recollections, the white ink is from Stampin' Up and colored inks are Tsukineko Brilliance Pearlescence inks, miscellaneous touches were done with Smooch Pearlized Accent Inks, the multicolored icing on the cupcake was done with my daughter's water color paints.

A little something new I have been doing to all my cards is decorating the back to match the rest of the card, why should the back be neglected, right ;) So being that I was super blessed to have won a Personalized Stamp from Stephanie Barnard - The Stamps of Life, it really became the main focus on the back of my card. I get so many compliments on it too! The great thing about the personalized stamps from The Stamps of Life is that your able to create your own sentiment just as I have done. There are others that have borders and images you can add to them also. If you decide to get a funny personalized stamp, it's a good idea to also get a more serious one for times when you are making a sympathy card etc.

For this card I used the following products from My Creative Time Lost At Sea Stamp SetStitched Daisy Die, and Stitched Hexy Dies. From Paper Smooches I used Chilly Chums and Chilly Chums Icons Dies. To stamp him I used Stampin' Up ink pad and then to color him in I used Copic and Spectrum Noir alcohol markers. The card stock is from Recollections.

For this card I used the following products from My Creative Time Stitched Rectangular Frame Dies & MoreFamily Is Everything Stamp Set, and Happy Thoughts Stamp Set. From Paper Smooches I used Chilly Chums and Chilly Chums Icons Dies. To stamp him I used Stampin' Up ink pad and then to color him in I used Copic and Spectrum Noir alcohol markers. For the paint splatters and other areas I used Tsukineko Brilliance Pearlescence inks as well as Stampin' Up inks. The card stock is from Recollections.

On this card I used Peachy Keen Stamps to stamp the bunny, the striped background, and the sentiment. As I mentioned in my last blog post, Peachy Keen Stamps recently announced they were ceasing the manufacturing of their stamps :(To stamp the black outline I used Momento Tuxedo Black ink then I colored the bunny with Copics and Spectrum Noir alcohol markers. For the white lined stamping I used Stampin' Up ink and for the sentiment I used Tsukineko Brilliance Pearlescence ink. The flowers and ribbon were purchased from Michael's Crafts, The elegant swirls are from Sizzix/Stepahnie Barnard Swirl Framelits 5pk Die & Stamp Set. The tiny little bow and banner were made by hand. The white cardstock I used it from Walmart and the pink base is actually some pink printer paper that I purchased from Walmart too.

This is the inside of the card but it could have been used as the front decoration too. The mint and pink papers are colored copy paper that I stamped with a polka dotted background stamp from Peachy Keen Stamps. I used white ink from Stampin' Up. The mouse is from Peachy Keen Stamps as well and I used Momento Tuxedo Black ink to stamp his outline then colored him in using Copic and Spectrum Noir alcohol markers. The banner I handmade, stamped with Tsukineko Brilliance Pearlescence ink, and the enamel dots are actually mini pony beads that I melted to make my own enamel dots.

The different colored dotted base of this card is a pre-made card from Stampin' Up. I cut a piece of Stampin' Up cardstock with the My Creative Time Stitched Rectangular Frame Dies & More and then ran it through a dotted embossing folder. For the thanks sentiment I used the Happy Thoughts Stamp Set from My Creative Time. I really wanted the thanks sentiment to stand out so I adhered Scrapbook Adhesive sheets to the Recollections cardstock and then cut the sentiment a total of 4 times. Using the adhesive sheets to stack the 4 layers together made it so much easier than trying to use glue.
For the inside of the card I wanted to tie in the dotted effect so I again used the Stitched Rectangular Frame Dies & More from My Creative Time, cardstock from Stampin' Up, and the same dotted embossing folder but I put it on the upper part of the card instead of the bottom. For the inside bottom I used Stampin' Up inks along with the My Creative Time Family Is Everything Stamp Set to create the background. For the center I used You Are Fabulous, Stitched Rectangular Frame Dies & More from My Creative Time and moregum4me from The Stamps Of Life.

Here I decorated the back of the card again using my Personalized Stamp from The Stamps of Life and the Stitched Rectangular Frame Dies & More from My Creative Time.

I wish you could see this card in person. I used Tsukineko Brilliance Pearlescence inks for all my stamping on this card and which gives it the most beautiful effect when the light hits it. From The Stamps of Life I used strawberries2stamp and thanks4oneyear. For the background I used a stamp from Peachy Keen Stamps. The cardstock is from Recollections with the exception of the white cardstock, that came from Walmart.

For the inside I used Tsukineko Brilliance Pearlescence inks for all the stamping. From The Stamps of Life I used strawberries2stamp and thanks4oneyear. The stripes came from a Peachy Keen stamp set. The cardstock is from Recollections with the exception of the white cardstock, that came from Walmart.

Back of the card using my Personalized Stamp and strawberries2stamp from The Stamps of Life

For the front of this card I used Sweet as Candy-Sweet Images from Whimsy Stamps and Happy Thoughts Stamp Set from My Creative Time. On the candy jar I used vellum instead of acetate because I wanted to give the effect of frosted glass. The ink is from Studio G and the cardstock is from Recollections.

For the all the little candies I used the Sweet as Candy-Sweet Images from Whimsy Stamps along with Versa Mark. Once it dried it left that darker color making it appear as though I had used a color ink. I LOVE all the amazing techniques you can do with Versa Mark! I did used Studio G ink for the "being so sweet" sentiment. The cardstock is from Recollections. I as well used the Stitched Rectangular Frame Dies & More and Chocolate Greetings Stamp Set from My Creative Time.

Backside of card is featuring my fabulous Personalized Stamp and strawberries2stamp from The Stamps of Life plus the Chocolate Greetings Stamp Set and Happy Thoughts Stamp Set from My Creative Time. The ink is from Studio G.


(Disclaimer: Any supply links listed above are links solely being used as a guide to show you what those items are. Some links may come directly from the manufacturer while others may not. Unless otherwise stated all products were purchased with my own money and in no way am I affiliated with these links nor the businesses associated with them. Please use discretion should you choose to shop from the links listed above. Thank you)

Sunday, February 1, 2015

Here's To A New Year :)

      Happy New Year everyone, even if it is the beginning of February, lol! It's a new year which means a beautiful new beginning! I told you all that starting in 2015 I wanted to start becoming more involved with blogging on a regular basis so these past couple months I have been really working on things behind the scenes to get prepared for all the amazing adventures that are to come. I have been working on how to make videos, tutorials, new techniques, my photography skills, and so much more. I have been crafting like crazy! Some of the things I've made were a memorial scrapbook for a relative, tons of Christmas cards, thank you cards birthday cards, and coloring a ton of images for the scrapbooks I am going to make my daughter. I also have been working on my dad's case. It is going on a year that I have been working on it. I think because it is so special my mind keeps swaying with how I want to decorate it, I just want it to be perfect. I initially was going to put all of the barber equipment back into it but the more I work on the case the more I would love to display it. I am hoping that someday my hubby will close in our back porch so I that I have a craft room and I think I would get so much inspiration from this case if I was able to see it everyday. After all my dad was an artist himself so who better than him to get inspiration from.
     So as you can see these past couple months have really been put to good use. I am really wanting to take my blogging from something I was doing just for fun here and there to making it something wonderful for you and for me! I want my blog to be a positive, fun, and encouraging place where anyone from a beginner to a long time crafter can come to not only get ideas but share ideas too. If your wondering why I decided to make this change of blogging more, let's just say I had an eye opening experience ;) Which brings me to a very big THANK YOU that I want to say to a very special person who came into my life from guess what... a blog. Her name is Karen and lets just say that she helped me to see why the combination of blogging and crafting can be life changing. She will know what I mean and I hope that by my blogging and sharing my creations with you more regularly it will open up doors for you to be creative. Don't let someone make you feel that your crafting is not good enough, because art is about exploration, being creative and having fun in what ever way you see it. My creations might not be what someone else likes but to me they are amazing because I am growing, I am getting to make memories with my daughter, I am having the time of my life, and I am just being me. How I feel when I craft is how I hope each and everyone of you will feel.
     Before I wrap up my blog post for today I would like to share with you a couple of the projects I made. I ended up not being that impressed with the "homemade" photo booths, you will see a lighting difference in some of the pictures, which is the variations of the "homemade" photo booths and lighting techniques I tried. So because I wasn't completely happy I found out that the company who makes the Foldio is coming out with a bigger and brighter Foldio. They were running a Kickstarter program which I took part in. Since they met their goal it appears that I will be getting a Foldio 2 sometime in March but heard it could even be sooner. I'm praying for the sooner, lol. If they are as good as I have heard then my pictures should look A-MAZING, fingers crossed on that one too ;) As always if you have any questions about my projects just ask :) I will be back sometime this week to show you even more of the projects I made during my "break". Have a beautiful day!

Scrapbook I made in memory of my mother in law. I made it as a Christmas gift for her sister.

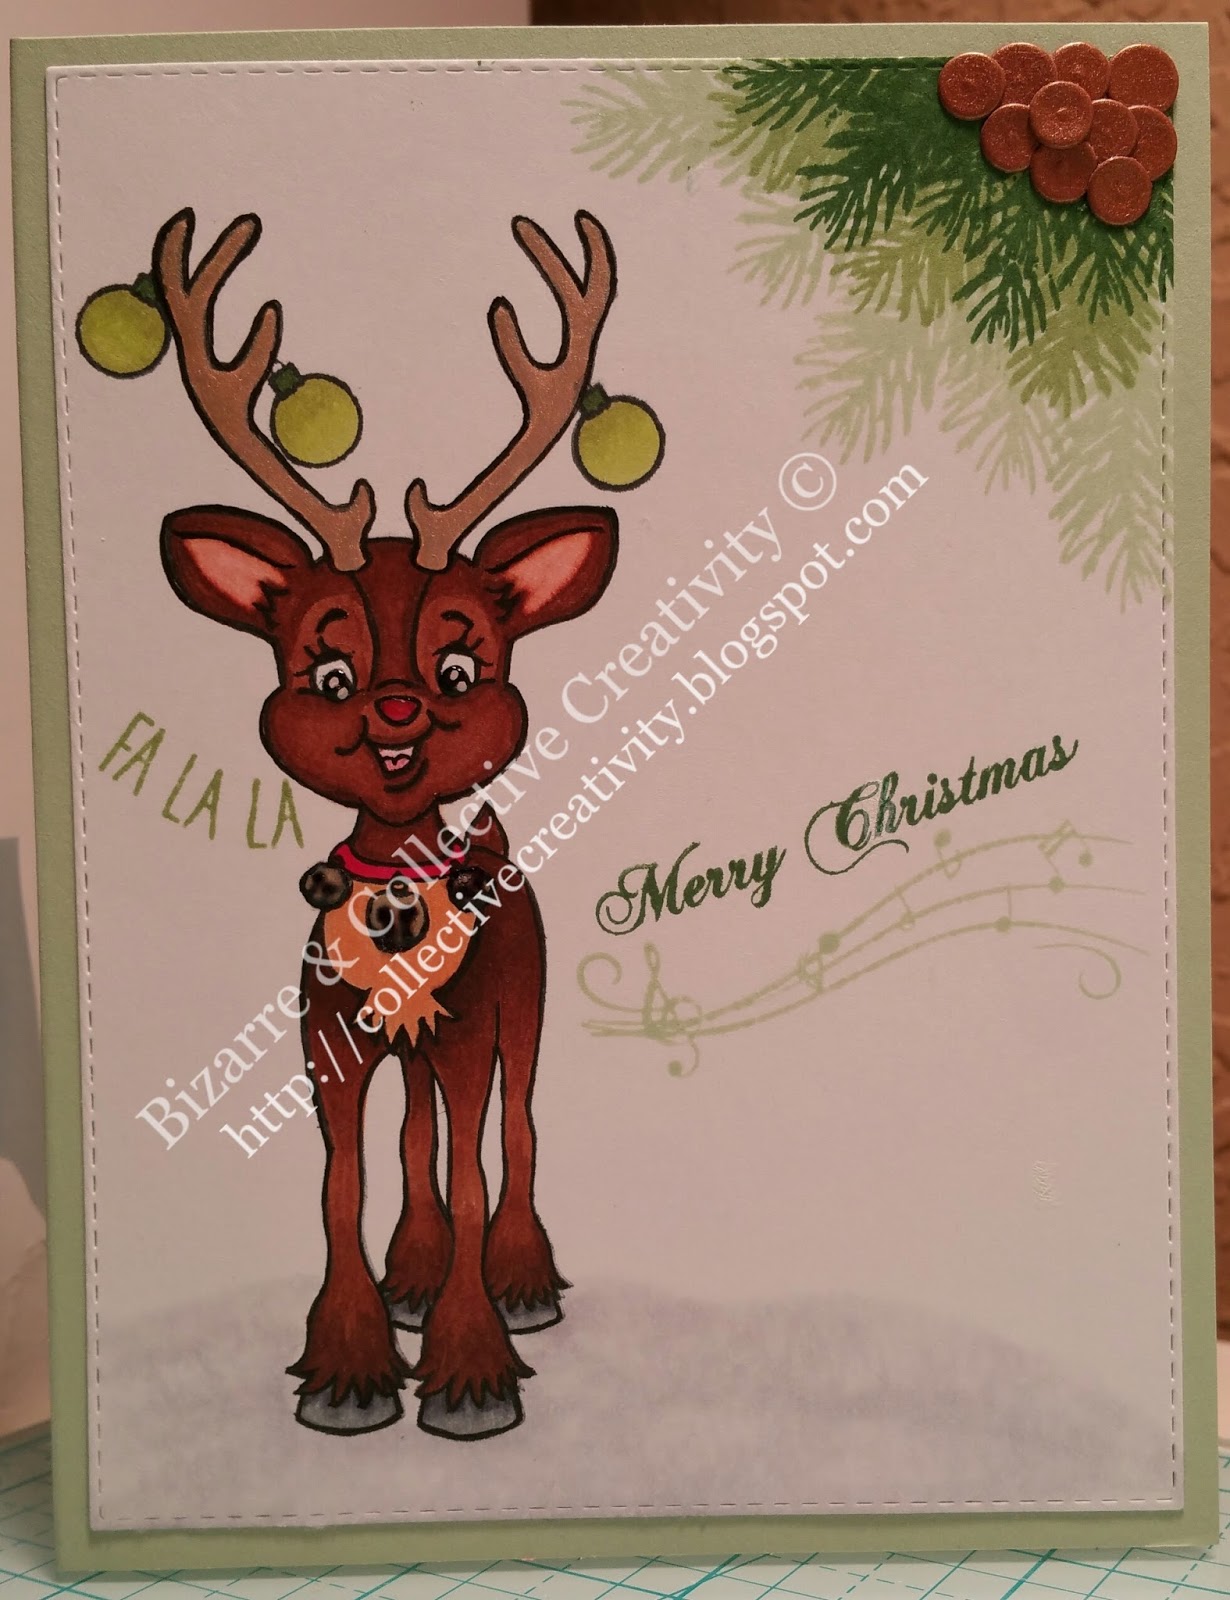
This was a Christmas card I made for my son. I used Boughs of Holly StampOh Deer Stamp Set and the Stitched Rectangular Frame Dies & More. The deer came from Peachy Keen Stamps. Peachy Keen Stamps recently decided to retire from making stamp sets :( The coloring was done with Spectrum Noir alcohol markers. I also used Stampin' Up ink and card stock, with the exception of the gold berries that came from some metallic gold scrap card stock.
This is the inside of the card which I used holly4Christmas stamp set from The Stamps of Life as well as Stitched Rectangular Frame Dies & More from My Creative Time. Inks are from Stampin' Up and I also used Spectrum Noir alcohol markers to color in the ornament.

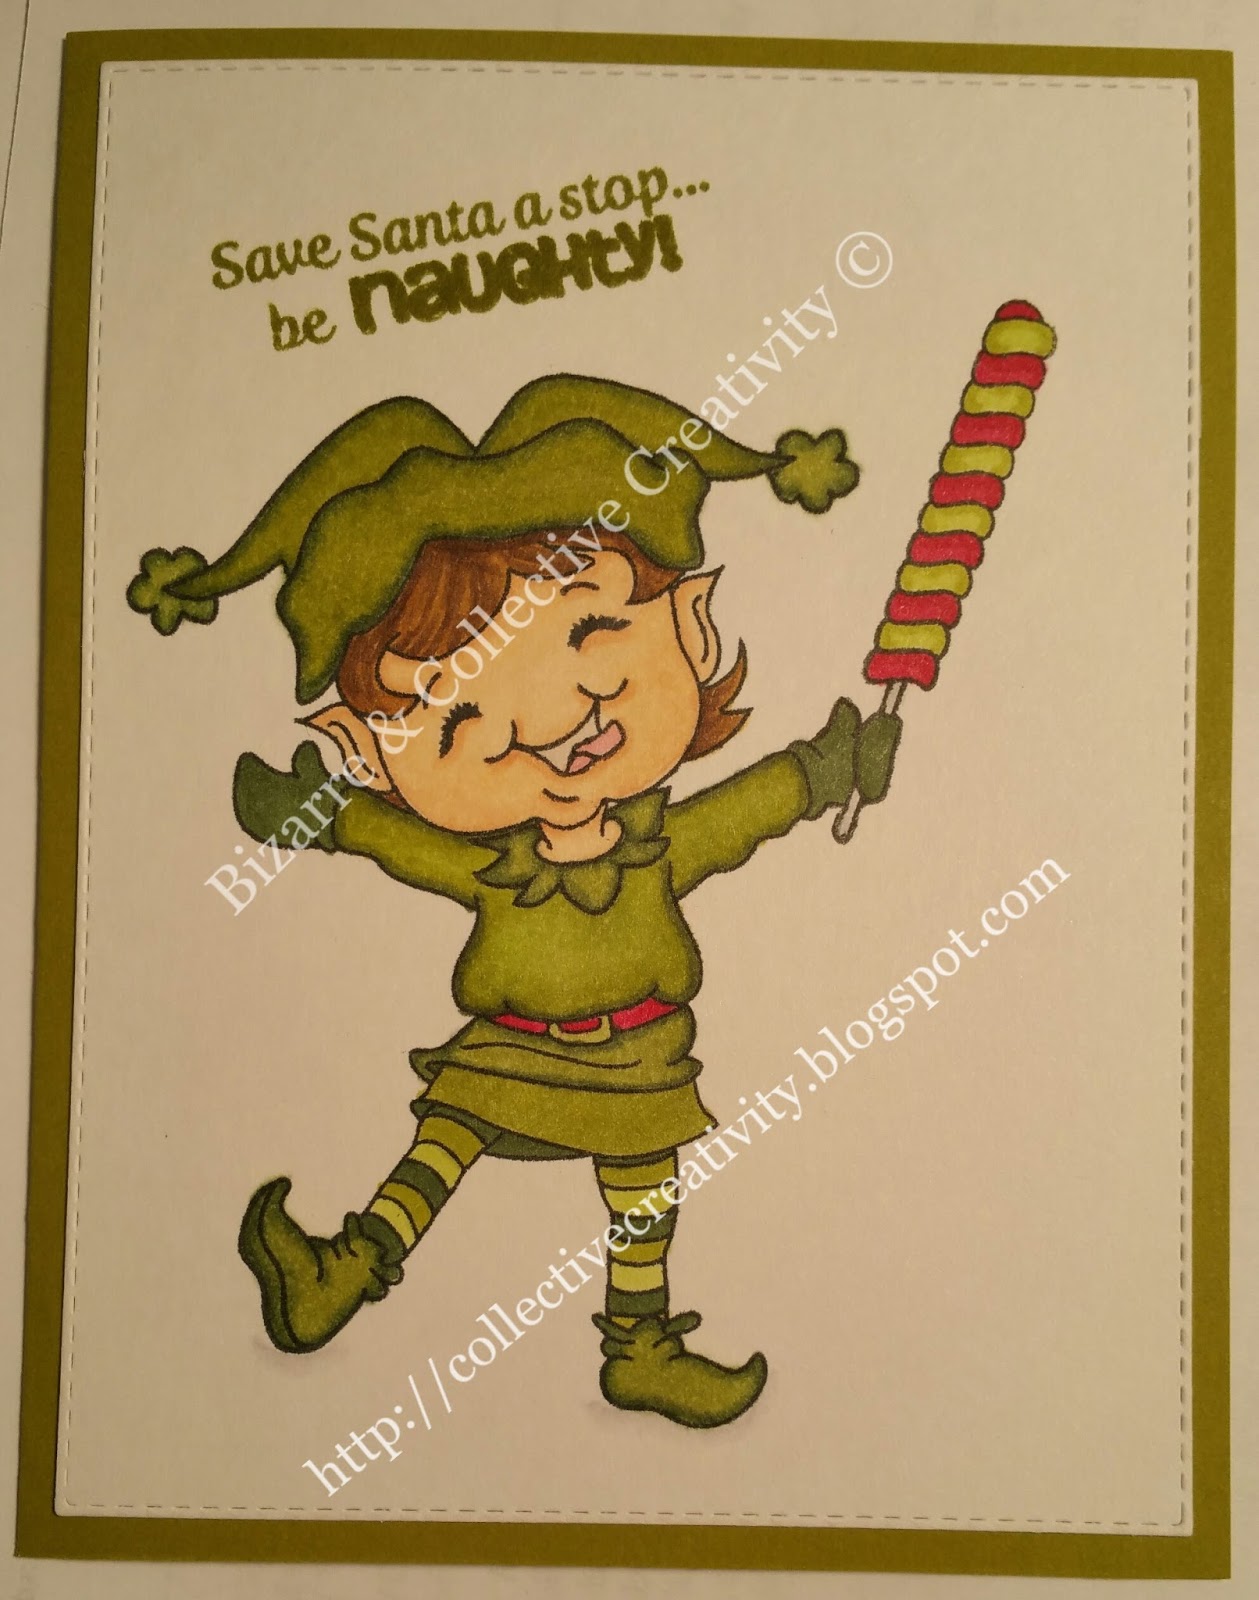
Christmas card I made for my husband using Stitched Rectangular Frame Dies & More from My Creative Time as well as Peachy Keen Stamps. Coloring was done with Spectrum Noir alcohol markers. I also used Stampin' Up ink and card stock.


This was the Christmas card I made and sent out to all my family and friends. The Card stock and ink were from Stampin' Up. For the Poinsettia and sentiment I used a stamp set from My Favorite Things which I believe has been discontinued. Then I also used the Stitched Rectangular Frame Dies & More from My Creative Time.
Inside of the card. I used holly4Christmas stamp set from The Stamps of Life. The Stitched Rectangular Frame Dies & More and You Are Fabulous from My Creative Time. The Card stock and ink were from Stampin' Up.

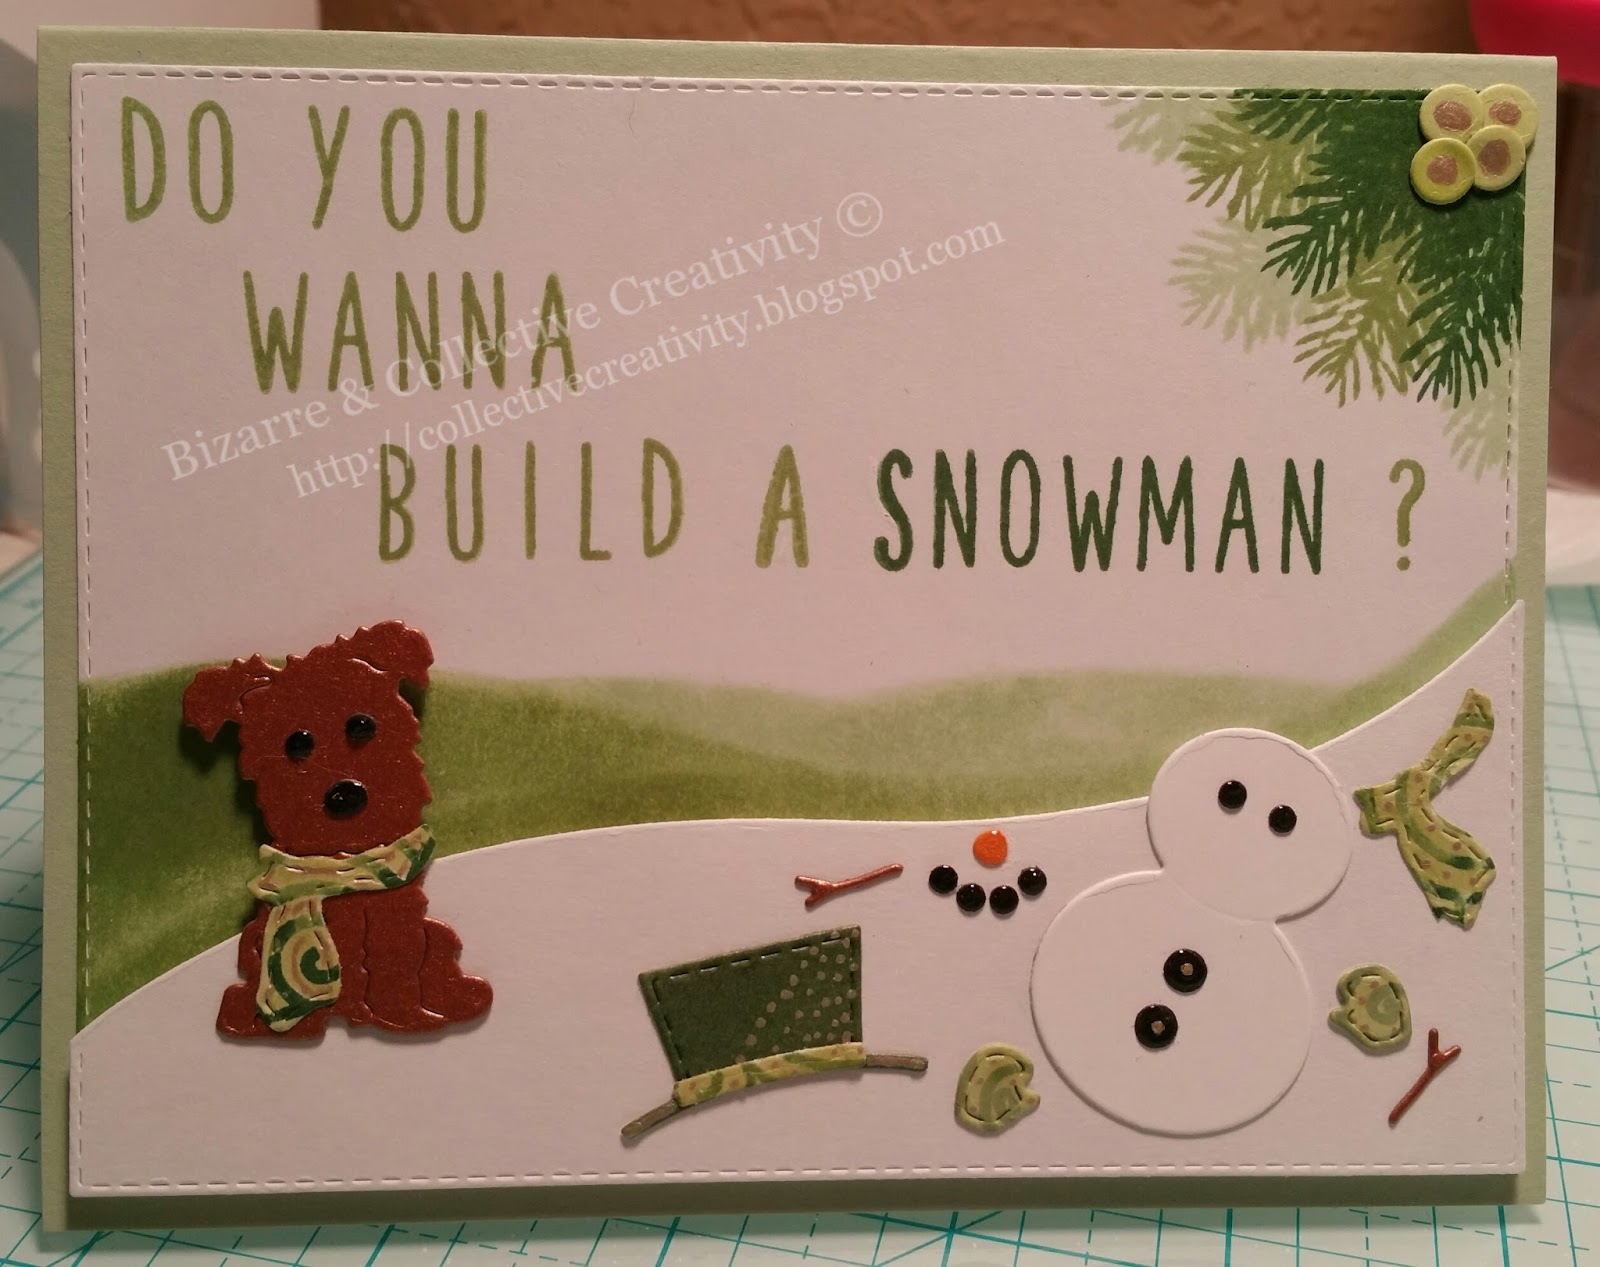
Christmas card I made for my mom and step dad. I used Boughs of Holly StampLoyal Friends Stamp Set, Stitched Rectangular Frame Dies & MoreWinter Snowman Dies and the Alpha Pack Stamp Set to make my own wording. Cardstock and inks came from Stampin' Up with the exception of the dog, I used metallic gold scrap cardstock. (PS-When My Creative Time did the sneaks for the Winter Snowman Dies I instantly thought of this idea, however I apparently was not the only one. I have seen several people used a similar ideas using the dog and snowman dies but I assure you in no way did I copy from anyone. I always will give credit to a person or company should I get an idea from them)

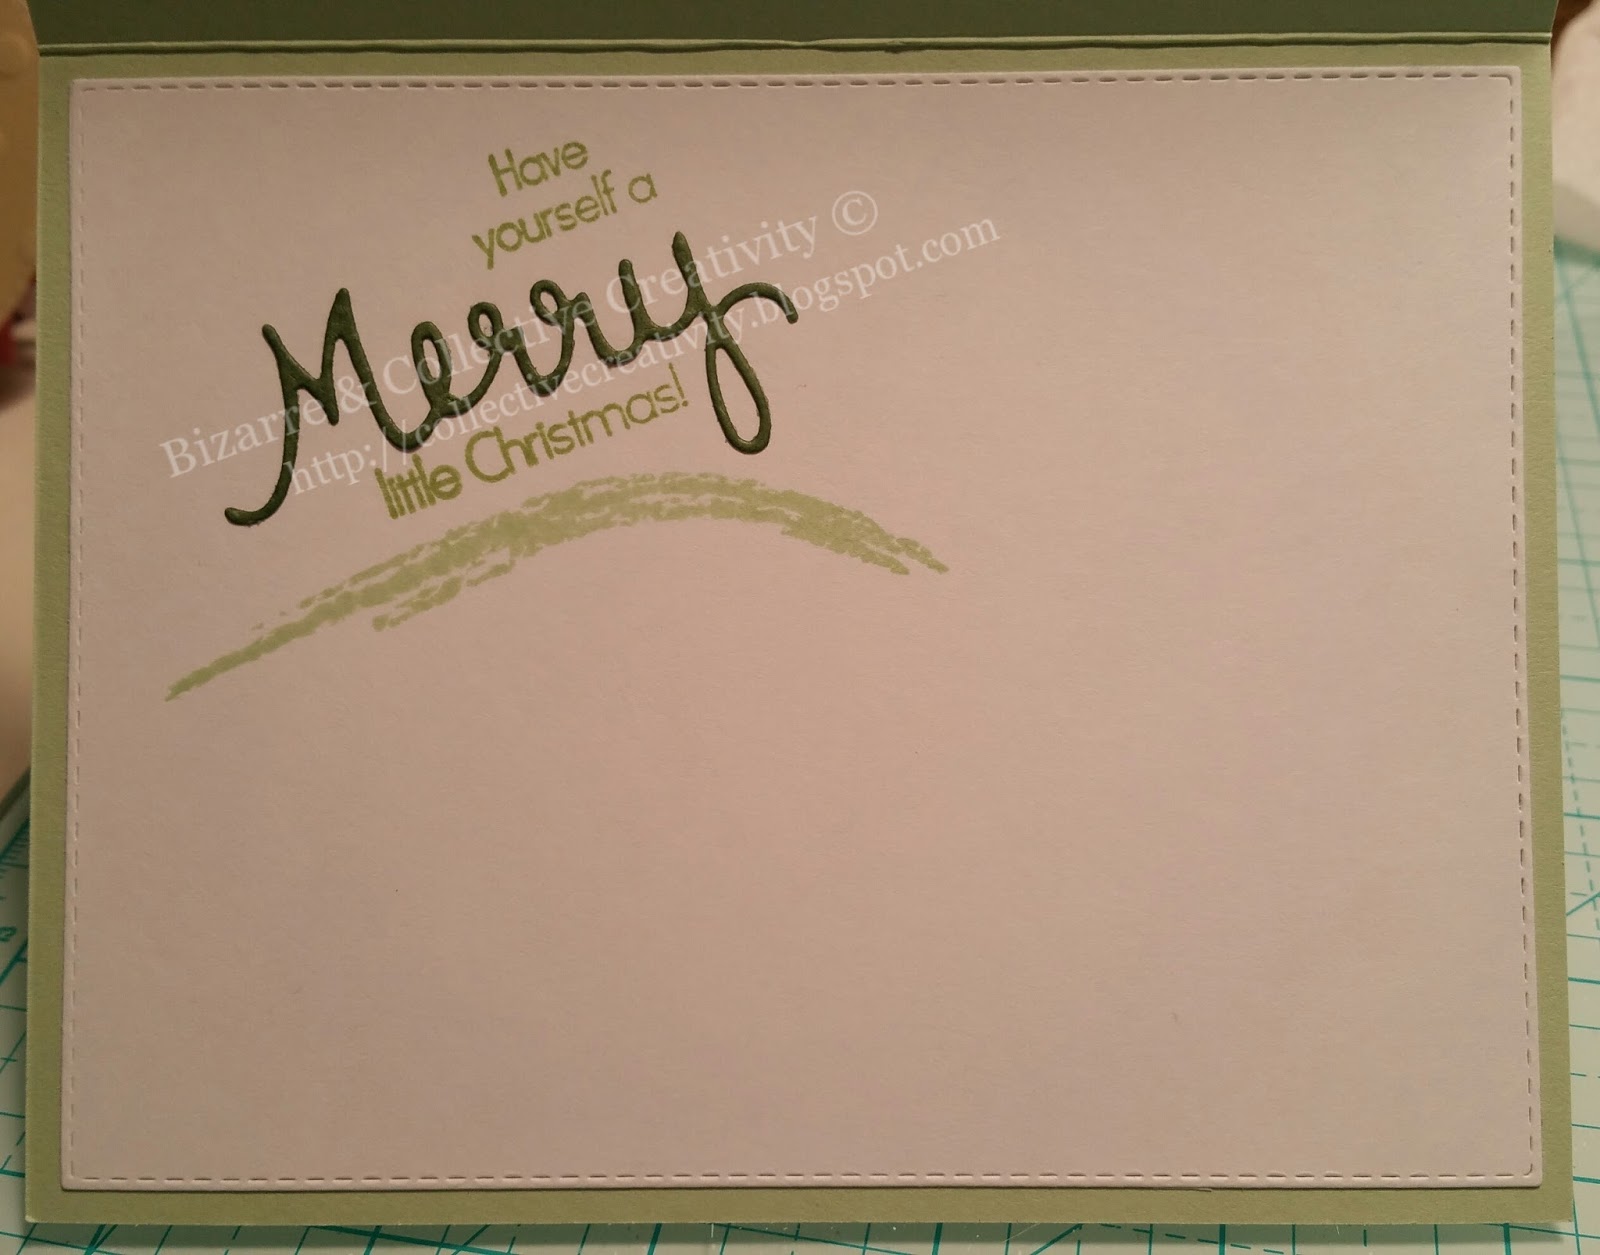
Inside of card I used Stitched Rectangular Frame Dies & More, Boughs of Holly Stamp and You Are Fabulous from My Creative Time. Cardstock and inks are from Stampin' Up.


(Disclaimer: Any supply links listed above are links solely being used as a guide to show you what those items are. Some links may come directly from the manufacturer while others may not. Unless otherwise stated all products were purchased with my own money and in no way am I affiliated with these links nor the businesses associated with them. Please use discretion should you choose to shop from the links listed above. Thank you)